|
How To Crochet!
|
I remember the first time I tried to crochet. I said to her, "Well, here goes nothing!" She got so mad and told me I shouldn't put myself down as I hadn't even tried it yet. She also said that crocheting takes practice, and there was no reason I couldn't do as well as she did, given time. I'll never forget my time spent crafting with her.
Gran Wright is one of the reasons I want to share my knowledge with you. She shared her skills with me, and I want to honor her by passing on my skills to you. I'll teach you how to crochet! I'll give you step by step instructions how to work the basic stitches. You will easily learn to form a slip knot, work chains, and single crochet stitches. Yes, right here today you can learn how to crochet. Fear not - read on... First of all you will need a crochet hook and some yarn. You may find it easiest to work with a larger hook (size 5.5mm, I/9, OR 6.0mm, J/10). A smooth yarn about worsted or aran weight is better for learning how to crochet, as you can see the form of the stitches better and projects grow quite quickly.
It is important to choose the right size hook and thickness of yarn. If your hook is small and yarn is thick - your work will be stiff and tight. If your hook is large and your yarn is fine, your work will be floppy and loopy. Yes - at first you may find learning how to crochet frustrating. Yes - you may need to pull out some stitches. Please don't let that get you down. I've been crocheting many years now, and I have pulled out large amounts because I didn't like the results. If you're not happy with the way your work looks, pull it out and start over - believe me, you'll be much happier that way! Firstly - how to hold the hook. I hold it like a knife, with my hand over the top of the hook. I find crocheting most comfortable that way. My Mom used to hold her hook like a pen. When she did lots of crocheting, she found that it hurt her middle finger. She tried the knife method and liked it. Try both ways and stick with what is most comfortable for you.

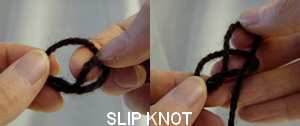
Whether you're learning how to crochet or you are more advanced, everything crochet starts with a slip knot. Here's how to tie one.
Leaving about a 4 inch tail, form a circle with the yarn. Place the ball end of yarn behind the circle and pull it through to the front. Tighten by pulling the tail end of yarn.

Place the loop over your hook and shrink the loop by pulling the ball end of yarn. You should still be able to slide the loop off the hook easily.
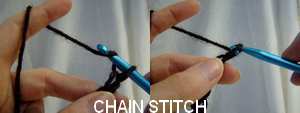
The first stitch you need to know when learning how to crochet is the CHAIN STITCH. (Right-handed crochet instructions - reverse if left-handed). Hold the tail of yarn in your left hand, the hook in your right. The picture shows how I hold the yarn as I work. I always have the ball of yarn on my left side.
*Push your hook away from you to the left under the ball end of yarn, hook the yarn over the top of the hook from back to front(called Yarn Over or YO), and bring it back towards you to the right pulling it through the loop already on your hook, forming another loop.
You just did your first chain! Give yourself a pat on the back!You're learning how to crochet! Don't get carried away though - do some more! Go back to the * and repeat until you're comfortable with the motion.
Also - very important - make sure that you can see daylight through each chain. If you can't, you won't be able to get the hook through to work your next row!

CHAIN STITCHES form the base from which all the other stitches are formed. You will see on one side your chain stitches look like a row of 'V' shapes sitting inside one another. The other side has bumps along the center. The 'V' or smooth side is usually classed as the 'right' side.
Now that you know how to form a chain stitch there is no reason you can't master the other crochet stitches, as they are all formed in the same way - yarn over hook and pull through.
The next step in learning how to crochet is mastering SINGLE CROCHET. Start by working 11 chain stitches. The stitch on the hook is never counted as a stitch - only count the ones already worked.
Push your hook into the 2nd chain from the hook (remember don't count the stitch on the hook). #You should go under both the top bar of the 'V' and the bump on the back. Hook the yarn (or Yarn Over), then pull the new loop through to the front of the 'V'. 2 loops on your hook. Yarn over again (YO), and pull that last 'yarn over' through the other 2 loops. Now you should have only one loop left on your hook.

Congratulations - that's single crochet! Now go back to the #, push your hook into the next stitch and keep practicing. Be sure not to twist the base chain (Ch). Keep the 'V' side facing you. When you get to the end you should have 10 stitches (sts) to work on. You should try another row. Turn your work over, chain one stitch, then start over from # forming a single crochet in each stitch below starting in the last stitch of the last row. Be sure to push your hook through under each whole 'V' along the top.
You have now learned the basics of how to crochet! Great Job! From here you can work many items. Check out my easy pattern for a hat worked only in chain stitch, single crochet and slip stitch. You'll see that it doesn't take fancy stitches to make something useful!
Now you can learn how to...
You will find that crochet grows faster than knitting, but it does usually end up using more yarn. At least with crochet you only have one stitch on the hook and can just pull the loop large and put it down when you need to. I know - you don't want to put your crocheting down now! Neither do I! The housework can wait - I'm crafting!!!! Good Luck!!!
Return to Homepage from How To Crochet
Learn about felting your crocheted wool project in your washing machine!


