|
Fingerless Gloves Pattern
|
 Try this easy fingerless gloves pattern. They're so quick to do you'll be making them for everyone as a last minute stocking stuffer.
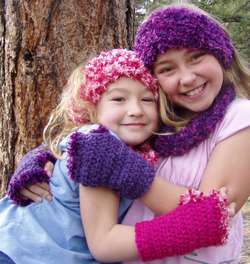
You can see by the picture that my nieces Morgan (right) and Madison (left) just loved them!
These are worked in TLC Amore - a worsted/medium weight yarn, andI used Bernat Boa for the trim (though you could use any fancy or eyelash yarn that isn't too long). This pattern will work with any worsted weight yarn whose gauge is the same as below. I used a size I/9 5.5mm hook.
Gauge for the fingerless gloves pattern is...
13sts x 10 rows = 4 inches
- ch - chain
- hdc - half double crochet
- rnd(s) - round(s)
- sc - single crochet
- sl st - slip stitch
- st(s) - stitch(es)
Sizes - XS, S, M, L
XS to fit child 6 - 12
S - Ladies Small/Medium (I wear medium rubber gloves & these are a good size for me)
M - Ladies Medium/Large
L - Ladies Large/Mens size
Pattern written in smallest size with other size options in ().
For starting round...instead of working into the front of the chains flip the chain over so you're pushing the hook under the 'bump' of each chain. This gives a nice 'cast on' edge look. Ch 1 at start of each row or round counts as 1 hdc throughout. Gloves are straight tubes with 3 rows left open forming slit for thumbhole. TURN AFTER EACH ROUND. Work 2 the same.
Here goes with this fingerless gloves pattern...
- LOOSELY ch 19 (21, 23, 25), join with sl st to form loop, ch1, hdc in ch where join made and in each ch around loop for 21 (23,25,27)sts, join with sl st to ch1 (ch1 at start counts as 1 stitch). Turn.
- Next rnd & each rnd to thumb hole (*total of 10 rnds from start)...ch1, hdc in each st - 21 (23,25,27)sts, join with sl st to ch1. Turn.
- Thumb hole (next 3 rows) ch2, hdc in each st to end, TURN. This leaves an opening 3 rows long. At end of 3rd row join with sl st to ch1 at start of row, turn.
- Repeat rnd 2, 3 more times (total of 16 rnds from start to finish). Break yarn & finish end.
- Join in edging yarn working from inside of glove at top edge, ch1, sc in each st around top edge for 2 rnds, break yarn, weave in ends.
- Join in edging yarn working from inside of thumb hole, ch1, work 16sc evenly around thumb edge, for 2 rnds, break yarn, weave in ends.
It really is that easy! This pattern can easily be adjusted in length so that you can create gauntlet length gloves simply by adding rows at the *. If you do prefer longer gloves, then be sure that you do a loose chain at the start so it will fit higher up the arm.
This fingerless gloves pattern can also be made longer at the 'palm' end just by adding rows there too. You can pull out your thumb and push them up your arms so that you don't need to take them off and stuff them in a pocket.
For guys - add a row or 2 at the palm end instead of working an eyelash edging. They also may need an extra row in the thumb section, and maybe even a couple of extra rows in the wrist section where the * is..
Hope you enjoy making them. This fingerless gloves pattern is a great beginner or kids pattern as it's so quick & easy. You can see the great results in about an hour (depending how fast you work).
Enjoy!
Have you checked out the ripple hat pattern?
Return to Homepage from Fingerless Gloves Pattern


