|
Easy Felted Purse Pattern.
|
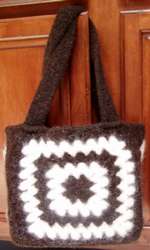
 You see a picture of this easy felted purse pattern and think, "Ican't make that, it's too complicated!" No way! It's really easy -honest - I'll tell you how right now.
I used worsted weight 100% wool and a 5.5mm crochet hook. You'll need 2 X 4 oz skeins in your main color and 1 X 4 oz skein in your contrast color. Skeins each approx 190yds. The gauge for mysquares worked out that the smaller squares (5 dc rounds) were 6 inches across andthe larger ones (10 dc rounds) were 12 inches across (before felting
The stitches you'll need to know are...chain stitch, single crochet,slip stitch and double crochet. ).
You'll also need to check out how to make granny squares.
Here goes with your easy felted purse pattern...
- Starting with your main color in the center of your granny square,work 2 squares with a total of 10 rounds of double crochet changing your color every 2 rounds.
- Work 2 squares with only your main color - 5 double crochet rounds total.
- Work 4 squares starting with your contrast color for 2 dc roundsand then your main color for 3 dc rounds - 5 dc rounds total.
Then, join your 6 smaller squares together using the single crochet method of crocheting seams.I joined them so the wrong sides were together giving a 'ridge' onthe outside joins. Don't worry if your seams don't look great - once youfelt your easy felted purse pattern all the 'suspect' stitches will disappear.

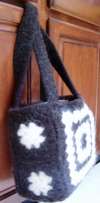
Your small squares should be joined in this order end to end like a scarf...2 X 2 color squares, 2 X single color squares, 2 X 2 color squares.This arrangement will form the 'gusset' of the purse, the 2 singlecolor squares forming the base.
Then, join one long edge of the 'gusset' to 3 edges of one of the large squares in the same way. There'll be the 2 X 2 color squares down one side, the 2 single colors along the bottom, and the other 2 X 2color squares up the other side. You will have the same number of stitches along the strip and around the large square, so you should get an even seam no problem.
Then join the other large square to the other side of the 'gusset' piece,again with a single crochet seam, wrong sides together. This really is an easy felted purse pattern, don't you think?
Now we come to the handles...
- Join in your main color at the top rightcorner of one of the large squares and work 80 chains loosely. Be careful not to twist this long chain. Join with slip stitch to the top left corner of the same large square to form the base row of one handle.
- Slip stitch along the top edge of the large square forabout 5/8 inch (replaces the chain 3 for a double crochet row, andjoins the handle with no sewing). Work 1 double crochet into each chain to end, then slip stitch to top of large square about 5/8 inchfrom base chain.
- Repeat last row to a total of 4 double crochet rows then finish off.
- Repeat from line 1 to line 3 on other large square for secondhandle. Your handles are now finished.
Now to finish the crocheting part of your easy felted purse pattern.
The final part is what I call a rope edging around the top. Withthe right side of your work facing you, startat one corner and work single crochet all around the top edge of thepurse. Don't worry about fitting in exact stitch numbers across the base of the handles, just fit in whatever you can.
Instead of turning over your work to come back around, keep the sameside facing you and work single crochets back around where you've justworked, but this time from left to right. You'll feel like you're tyingyourself in knots working backwards, but you'll end up with a neat twisted rope effect around the top.
Ok - finish off your ends by running them along the inside of yourwork with a needle. If you've followed my instructions for working over your ends then you should only have 1 end to finish off - that one from your rope edging. All the rest you could have worked in whilst crocheting. You must practice that - it's a real winner!
OK - now for the fun felting part of this easy felted purse pattern!Place it inside a mesh laundry bag and pop it in a hot wash/coldrinse, long cycle in your washing machine. Also put in a couple of well-washedold pairs of jeans, or something else heavy which can withstand ahot wash and not leak dye or fuzz all over your newly made purse.
I did that same cycle twice with my purse and that was ideal. So,from a 12" X 12" X 6" start - the finished dimensions are 9.25" X 9.25" X 4.25". The straps worked out 2" wide which reduced to 1.5" wide and 22" long. I also tossed it in the dryer on low, still in the mesh bag, but on its' own - no jeans. So, I ended up with approximately a 25% shrinkage.
Well - now you can work out what size of the easy felted purse pattern you'd like to make.You can alter the size just by adding or removing rounds. Rememberthe number of rounds on the smaller squares should be exactly halfthe number of rounds of the larger squares. So, if you decide yourlarger squares should be 16 rounds, your smaller squares should have8 rounds.
About colors? I thought this dark brown and aran looked pretty retro. You could try other contrasts - red/black, pink/purple, green/yellow,or go for more subtle mixes - shades of blue, browns, greys.Really - whatever takes your fancy. Go wild and enjoy your new easyfelted purse pattern!
Let me know how you get on by contacting me. I'd love to see the results of your hard work.
Have you tried felting by hand?
How many felting methods are there?
Return to Homepage from Easy Felted Purse Pattern


