|
Crochet Rope Edging
|

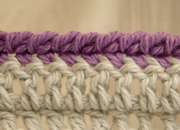
This crochet rope edging (also known as Crab Stitch) is so easy you'll be working it on everything. At first it will feel like you're working all twisted up and back to front (as it's worked from left to right), but once you get used to the action you'll be off and running.

The only stitches you need to know are single crochet and slip stitch.
So, you have your finished piece you want to edge. Hold it right side facing you, chain 1, then work single crochet stitches in the normal way (right to left) around where you want your edging to go. When you get right around your work don't turn your work over. Keep the same side facing, slip stitch to the first single crochet, chain 1 then work single crochets from left to right all the way back to the start. Slip stitch to the chain 1 then you're done.
Sometimes the second row of single crochets in the crochet rope edging are a little difficult to work. The stitches can be a little tighter to pull through due to the slight twist in each stitch. You'll get it though.
See the step by step pictures below to help show you how this stitch is worked.


Ok that's it! You'll see if you look directly at the edge the stitches
twist over the top giving this edging the 'rope' look.
Easy and versatile, use it as a neat finish to a simple project. Enjoy!
See how easy it is to crochet seams.
Use this edging to finish your crochet purse.
Return to Homepage from Crochet Rope Edging


