Crochet Picot Edging
Add A Little Interest

You're here to learn about crochet picot edging, right? Well, you can
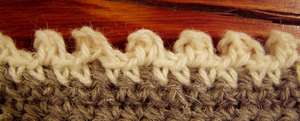
work picots right next to one another for a totally bumpy edge,
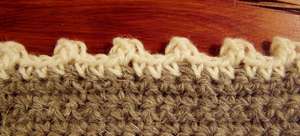
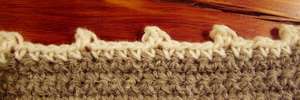
or you can work them at intervals to add just the occasional bump
to your edges. The pictures on this page show you both versions.
You work picots using only chain and single crochet stitches.
That makes them really easy, doesn't it? Yes!
You can work a row of single crochet around your project first. You
would do this especially if you want to work your picots farther apart, so you could work out exactly where to place your picots.
If you're wanting to work picots close together, then you can get
away with working the picot row straight along the unfinished edge.
You work a single picot by working 3, 4 or 5 chains (depending
what size bump you want), then single crochet into
the first chain and single crochet in next stitch along the edge.
You can continue with picots in every stitch or spread them out along your row.

Try joining your yarn to your project you want to edge where you want to start, then *work 1 X 3 chain picot, single crochet in next 2 stitches, repeat from * for alternate picot/single crochet edging.
For less frequent picots along your crochet picot edging just work more single crochets before you work your next picot, ie. 1 picot,
single crochet in next 5 stitches, would give you a picot then a 4 stitch gap before your next picot (a multiple of 6 for working out
stitch numbers).
To work out how frequently to work a picot along an edge with a known
number of stitches think about this...say you have 61 stitches...
- a picot will take up 2 stitches (the stitch you start from and the single crochet to join it back to your project)
- decide how many picots you want along your edge = 10
- multiply the number of picots you want by 2 to give you the number of picot stitches, 10 X 2 = 20
- subtract this number of stitches from the total number of stitches you have in your row, 61 - 20 = 41
- the remaining number divided by the number of picots you want, will give you the number of single crochets you need to work in between each picot, 41 /10 = 4 + 1
- to keep your project even, split the larger one of these single crochet
groups in two and place at either end of the row, ie. 3 sc, *1 picot, 4 sc, rep to last 4 sts, 1 picot, 2 sc.
 Don't you think crochet picot edging is easy now. Yet another
edging to add to your repertoire. Congratulations. Now to decide
what to edge?
Well, it's cute around the edge of a baby bib or bootees, around the cuffs and neckband of a tired old sweater. Edge placemats or rugs
with crochet picot edging, or maybe headbands or mittens too. You
could use it on a baby blanket - not too big a loop for baby to
chew on.
So many possibilities for this useful little edging stitch. Now,
get your thinking cap on and go, go, go.
Try out the fun twisted tassel edging
Do you know how to work scallop edging too?
Return to Homepage from Crochet Picot Edging